Help
Table of Contents:
Click to navigate:
About OCShop
Requesting an Account
How to Navigate around OCShop
Finding Your Product: Browsing Categories
Finding Your Product: Search Function
Completing Your Purchase/Checkout
Making a Payment Online
Storing Payment Information
About OCShop:
OCShop, the O'Connor Company B2B website provides you with access to all of the O'Connor Company (a HVAC whoelsale distributor) products that are available through our branches or via phone orders.
Users of OCShop can look forward to:
- Placing orders 24/hours a day 7 days a week
- The ability to order from any location via your smartphone or personal computer.
- Access to pricing information to help build quotes for your customers on the go
- Important accounting information such as your current statement, invoices, and order history (both online and offline orders)
Who can use OCShop:
OCShop is a B2B (business-to-business; wholesale) website and as such, OCShop is available to O'Connor Company customers only. If you are an HVAC, plumbing, mechanical contractor, or simliar business, feel free to inquire about becoming an O'Connor customer by contacting us at webinfo@oconnorhvac.com.
In order to purchase equipment from Trane, American Standard, Ameristar, Bosch, Climatemaster, and Mitsubishi products, your business must be located within the territory of that manufacturer served by O'Connor Company (counties in Kansas, Oklahoma, Missouri, Nebraska, and Iowa - coverage varies by manufacturer).
Consumers interested in purchasing parts, supplies, and tools are welcome to request an O'Connor account regardless of their geographic location. Some restrictions apply to products with safety restrictions or that require special licensing. Apply by following the instructions in "How to get an Acccount" below.
Back to Top of Page
How to get an Account:
If you are an existing customer you can request a web account at the "Log In" screen of OCShop. You will need a recent copy of your invoice to register. If you do not have an active account please contact us at ocshophelp@oconnorhvac.com.
You can navigate to the Log In screen from the OCShop home page by clicking the link at the top right of the page labeled "Click Here to Log In", as shown in the following picture:
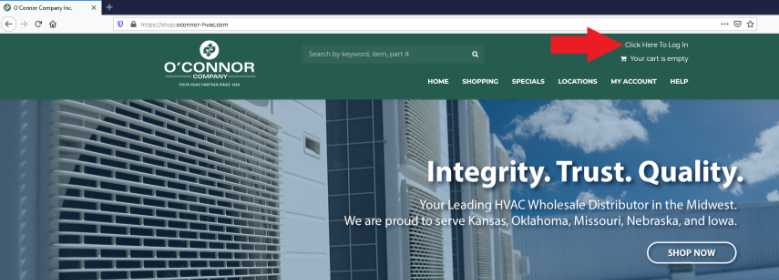
Alternatively, you can enter the address "/secondary/login" into the address bar of this web browser to go to the page, or simply click here.
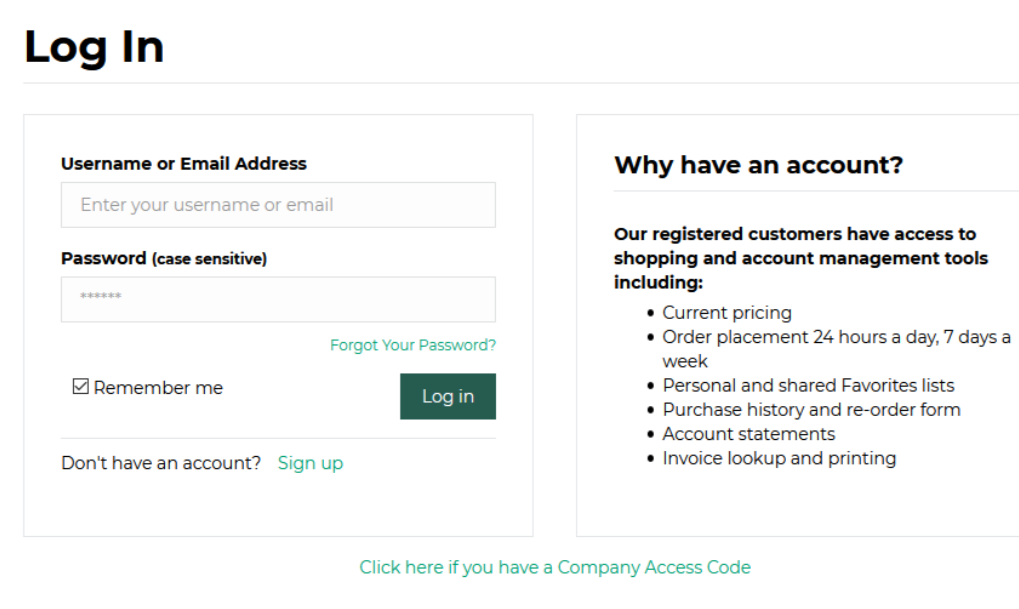
At the Log In page, you can either sign in (if you already have an account) or Create an Account. To create an account select "Sign Up" under the "Don't have an account?" option.
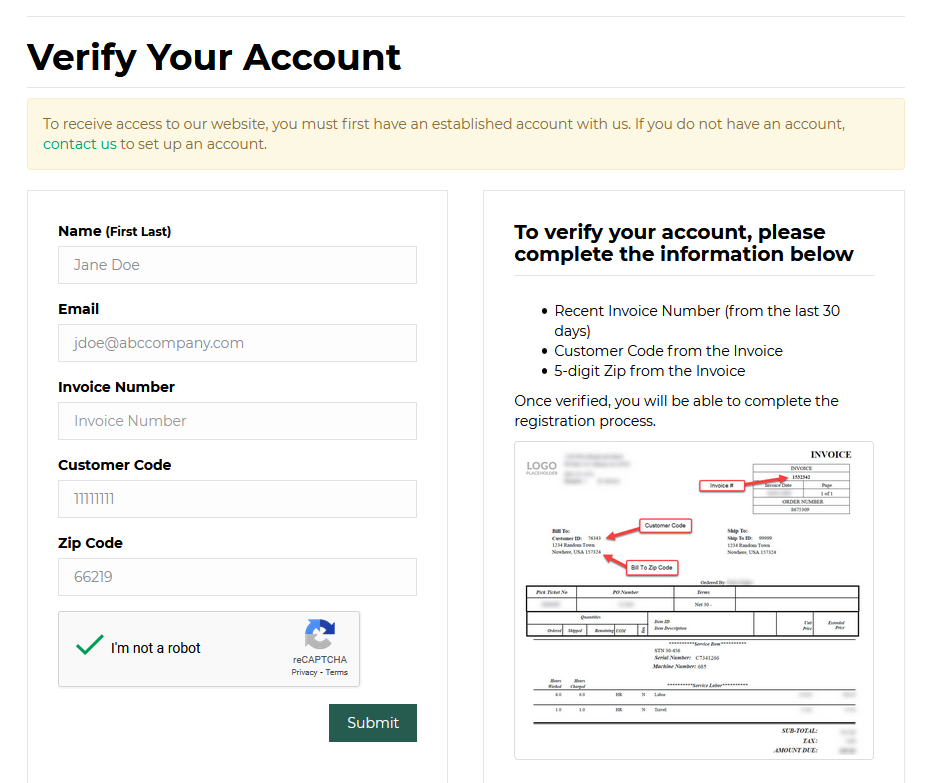
Enter your Name, Email, Invoice Number, Customer Code, and invoice Zip Code into the fields given. Click "I'm not a robot" checkbox and then click the "Submit" button as shown here:
At this point you should see a page showing that Your Request Has Been Received, as shown below, and will receive a registration confirmation email.
.png)
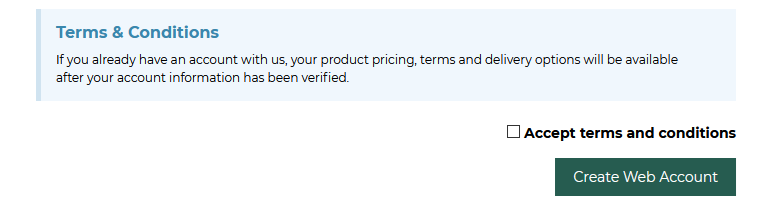
Follow the instructions and click the link in the email to confirm your email address and complete the Web Account Details, shown below. The Company Name and Physical Address will be populated, but you will need to enter your direct Phone number, create a Password, and select an option for Referred From and Type of Business.
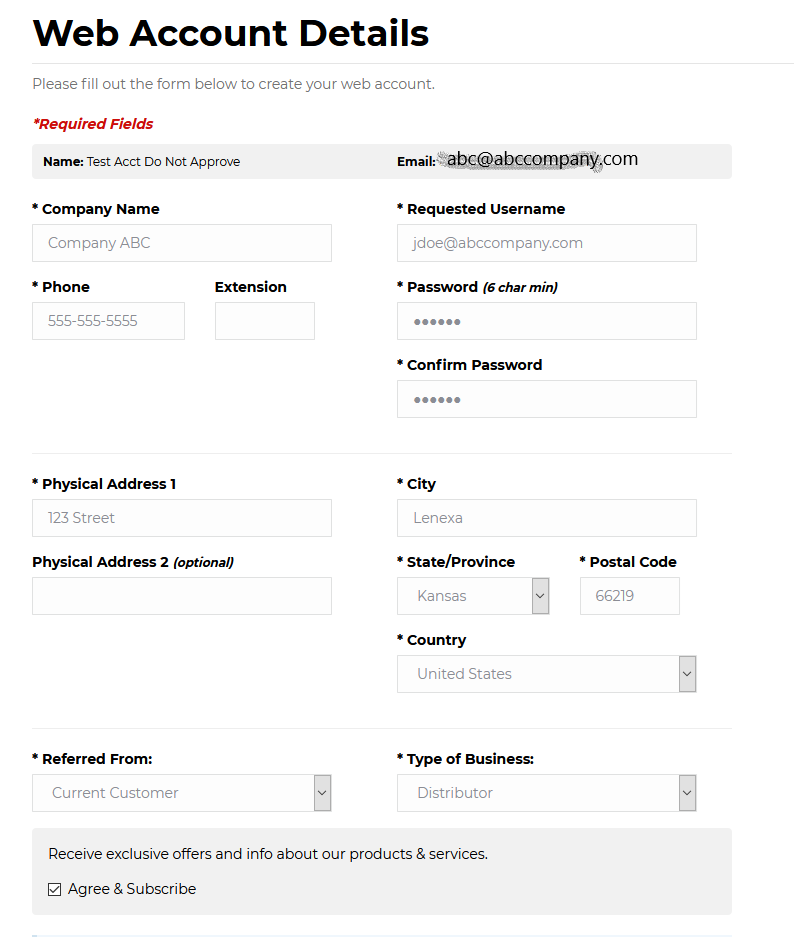
Accept the Terms and Conditions and click Create Web Account, shown here:
You will see a Thank you for creating an account! message and receive a Thanks for registering with Shop.OConnor-HVAC.com email.
You account request is now complete and is pending until the administrator can review and approve your request. This generally involves the admin contacting your Territory Manager and verifying the e-mail address and contact name used.
When your request has been approved, you will receive an e-mail notifying you. This e-mail will have instructions on how to set up your password and direct you to the site.
Back to Top of Page
You can navigate through the different parts of the site with the menu at the top of the web page. Shown in the picture below are your options:

- Shopping Cart: Links to your shopping cart, which allows you to review, place, or cancel your order.
- Quick Order: A quicker method of placing orders if you know the part numbers of the items you want to purchase.
- Favorites: View all items that you have listed as your favorites. This could be used to quickly view items that are relevant to you.
- Templates: You can create "prefab" orders. If you place the same order, or a similar order each time, start with a saved template to save a lot of time.
Hover over "My Account" to see the following subcategories:
- My Account Home: Takes you to an overview of your account details.
- Favorites: View all items that you have listed as your favorites. This could be used to quickly see items that are relevant to you.
- Recent Web Orders: See orders you have recently placed through this site.
- View Invoices: See invoices for recently placed orders.
- Current Statement: View account balance and related information.
- Purchase History: Similar to the "Favorites" page, but generated automatically, based on commonly-purchased items.
- Saved Carts: View and complete half-finished orders.
Back to Top of Page
Finding Your Product: The Categories
The products we sell are divided into four different categories: Equipment, Parts, Supplies, & Tools. Another category takes you to a list of products currently on sale.
- Equipment: Packaged heating and cooling equipment. This is where you will find air-conditioners, furnaces, heat pumps, air handlers, and other motor-bearing HVAC products.
- Parts: Replacement parts, peripherals, and accessories for HVAC equipment. You can find compressors, motors, line sets, and other products needed for the installation and maintenance of HVAC equipment.
- Supplies: Tape, Nu-Calgon chemicals, electrical wire, and connectors, and other support products.
- Tools: Hand tools and power tools, meters, and other instruments to help you get your work done.
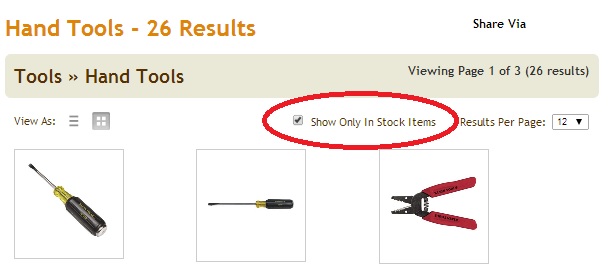
Is it in stock?
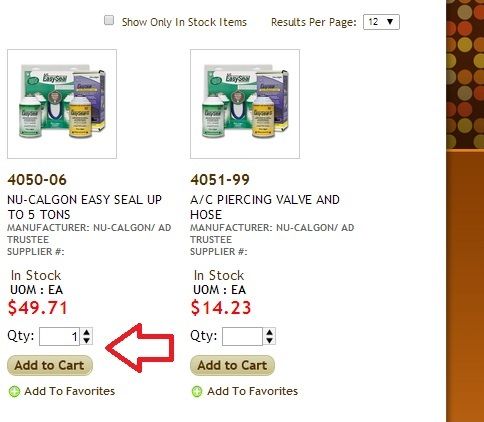
When browsing products in a category, you can filter out items that are not in-stock by checking the “Show Only In Stock Items” box located at the top of the page (see picture.)
Too Many Items?
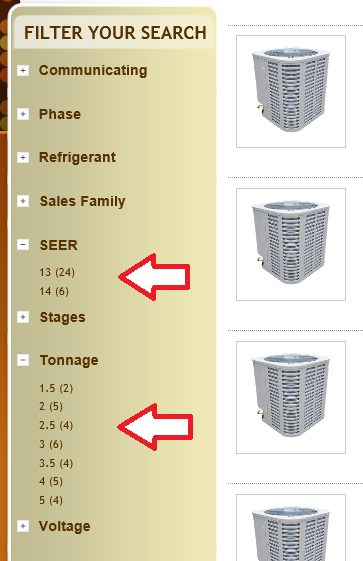
Some categories have a lot of items in them, and it can be hard to find the specific item that is right for you. You can filter out the items you don’t want to see with the sidebar on the left side of the screen.
Want to find a specific 13 SEER, 2-ton air conditioner? There are hundreds of units in the AC category and it can take a long time to find the right one. If you filter out the items you don’t need you can save time.
- On the left side of the screen there is a window labeled “Filter Your Search.” You can filter the items that show up on the screen by different attributes. These attributes will be different depending on which category you are browsing.
- One of the options here (for AC units) is “SEER,” another is “Tonnage.”
- Click “SEER.” This will expand, showing a menu of all available SEER ratings. Click “13.” The page will re-load. Now you will only see the 13 SEER AC units O'Connor has for sale.
- Click “Tonnage.” This will also expand. Click “2.” Now only the 13 SEER units that are 2-ton will be visible.
- The number of products has been narrowed from 100 to less than 10. This makes it much easier to find exactly what you want.
Active filters of your search are on the left side of the screen, with a red “X” next to them. Click on the red X to remove the search filter.
 |
||
|
|
|
Nonstock Item?
These items are not stockable in your location but may be in other O'Connor branch locations. We may be able to sell you one, but you will have to call your branch to place the order.
Back to Top of Page
Product Search:
Another method of finding the item you're looking for is the search function. The search bar is in the top right corner of every page of OCShop. You can search by a keyword, by the item number, or by part of the item number as pictured here:
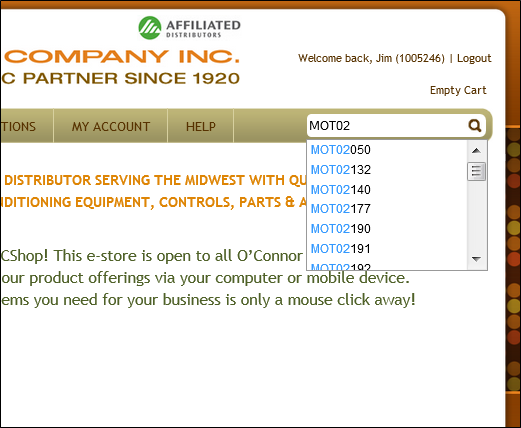
OCShop will suggest search results based on what you have entered into the search bar, giving you a list of candidate items to choose from. Clicking the magnifying glass icon next to the search bar will give you a more detailed list of your search results.
Search is one of the fastest ways to use OCShop if you are familiar with the part numbers of product you want to purchase.
Back to Top of Page
Making a Purchase:
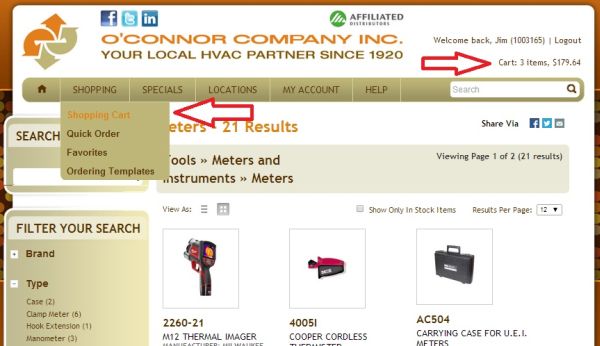
When you find an item you want to purchase, select the number you want to buy and click “add to cart.” The item will be saved into your order (your shopping cart.) When you’re done shopping and are ready to place your order, it's time to view your shopping cart, to review your order. You can get to the shopping cart by clickling on your cart, which is in the upper right corner of the screen, or from the drop-down menu that appears when holding your mouse cursor over the "Shopping" tab on the navigation bar.
 |
|
|
 |
|
|
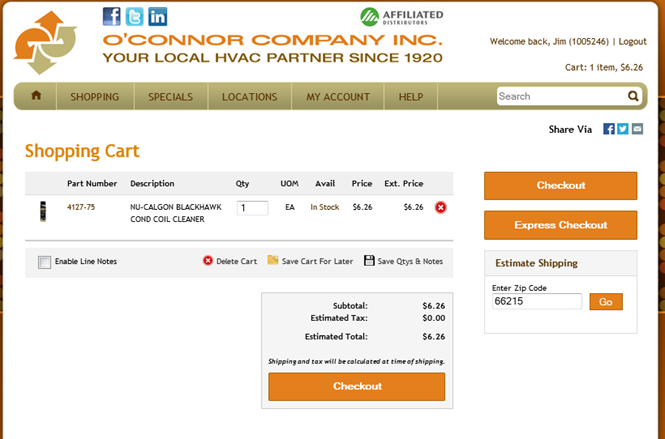
You can now review your order and make any final changes. You can also continue shopping by selecting the categories on the left-hand menu. If you want to cancel your order, press the “delete cart” button. This will remove your entire order from the system. There is also a drop-down menu of shipping options on this page as well.
When you’re ready to send in your order, go to your cart, and press the “checkout” button in the bottom right corner of your cart screen. You will then be asked to verify your shipping and billing information. If this is all in order, press “continue.” You can then confirm and place your order.
 |
|
|
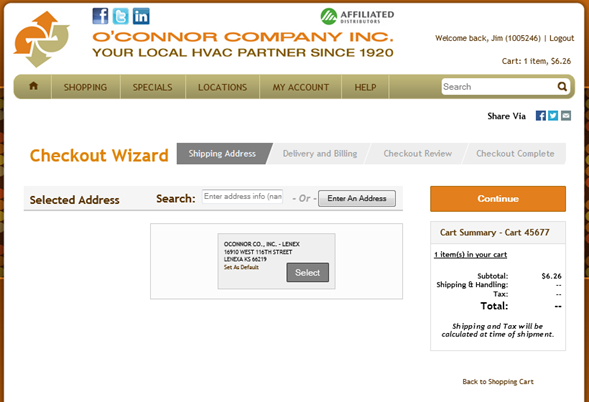
The next step is the checkout process, which is divided into three pages. On the first checkout page, you can review your shipping details as well as add notes to individual products.
You can save multiple shipping addresses here, allowing you to quickly select where you want the product to be shipped. If no addresses are present, or the address you want to send the product to isn't present, press the button labeled "Enter An Address" to create the new destination. Clicking the "Continue" button takes you to the next step of the checkout process.
 |
| The first checkout page |
The second checkout page is where you can select your delivery method and payment options. There is only currently one option for payment method, which is "on account." This will default you to your current payment method used when placing any normal order.
There are three delivery options:
Best Way - This is standard O'Connor shipping by a shipping carrier hired by O'Connor. This is recommended for deliveries.
Customer Pickup - Orders will be assembled at your default O'Connor branch, and prepared for you to pick them up.
O'Connor Delivery - This option is only viable in Lenexa for certain situations. The O'Connor company will send the item on the O'Connor delivery truck. Orders that cannot be delivered this way will be automatically changed to a "Best Way" method.
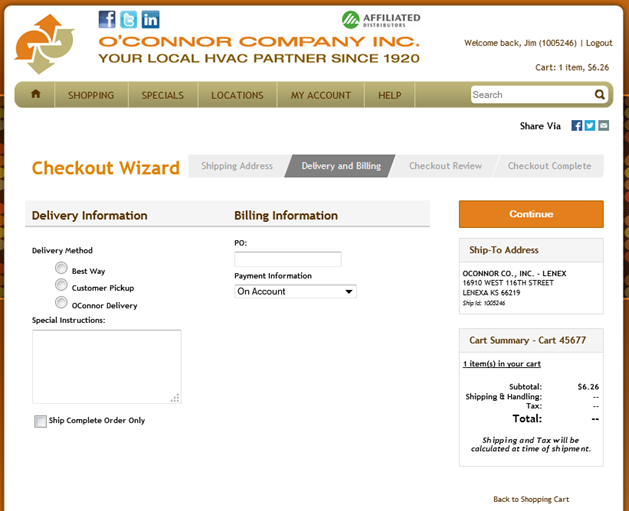 |
| Checkout page 2 |
The third checkout page allows you to review your order, address, and shipping methods one last time before finally placing it. Check for errors in your order or details. If you are satisfied, click the "Finish Checkout" button, and the order will be finalized. You will then receive a confirmation e-mail shortly.
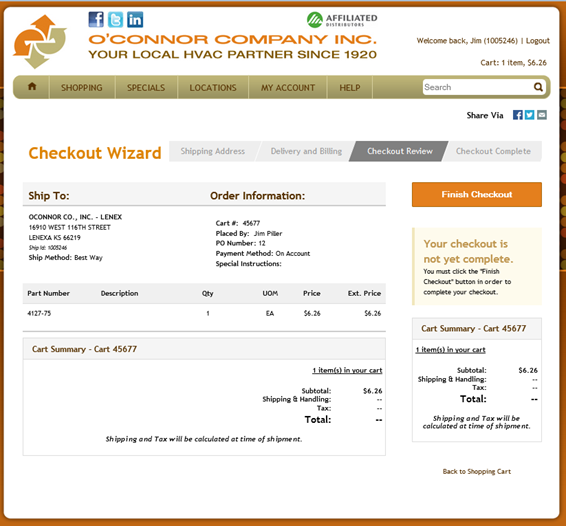 |
| Third (and final) checkout page |
Making a Payment Online:
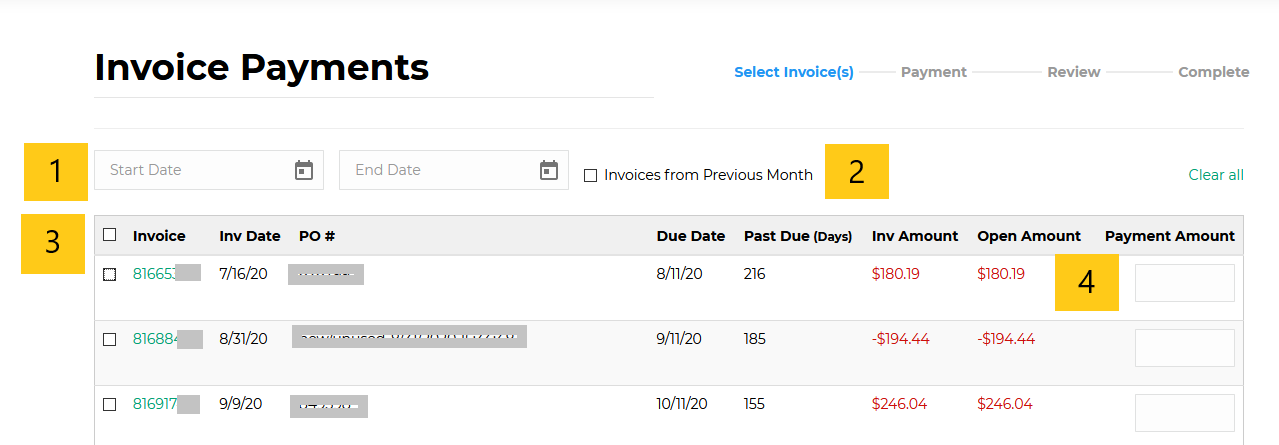
2. Invoices from Previous Month checkbox - this option automatically selects all of the invoice payments from the prior month.
3. Invoice Selection checkbox - click the checkbox at the top of the column to select all invoice payments, or select specific invoices.
4. Payment Amount - enter the dollar amount to be paid against the invoice(s).
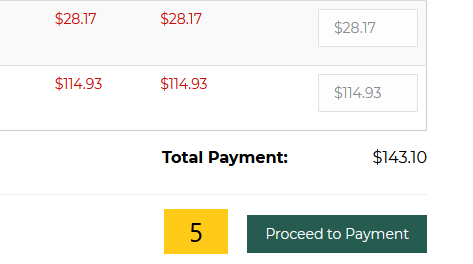
5. Proceed to Payment- once the appropriate invoices have been selected, click "Proceed to Payment" at the bottom of the screen to go to the next step.
.png)
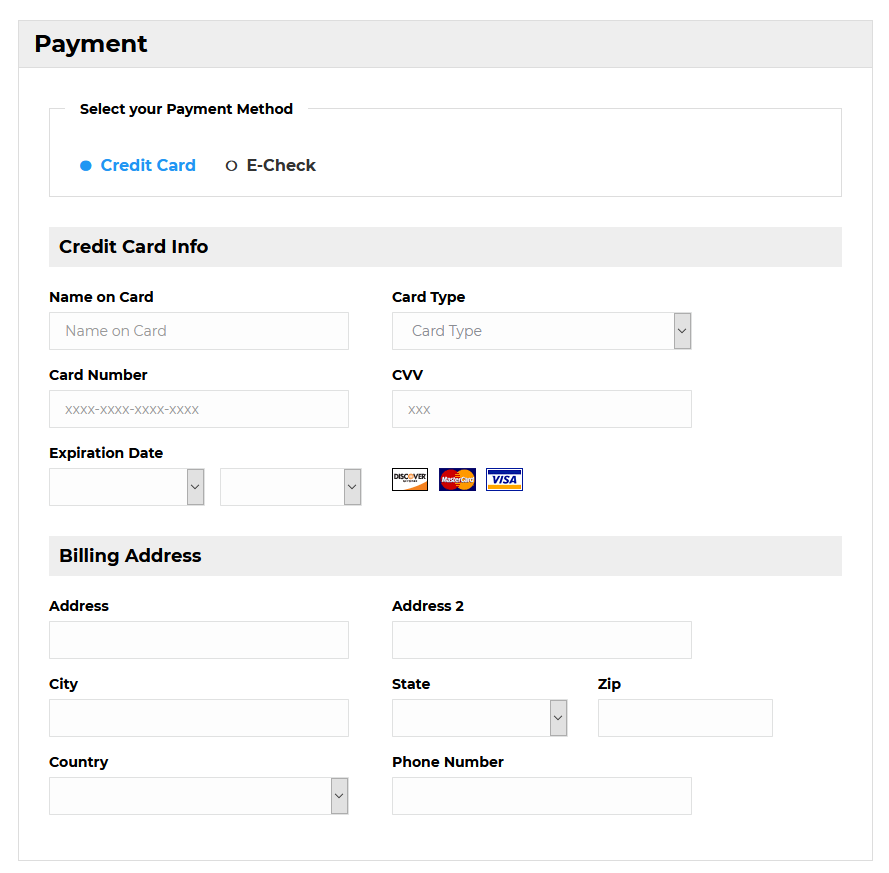
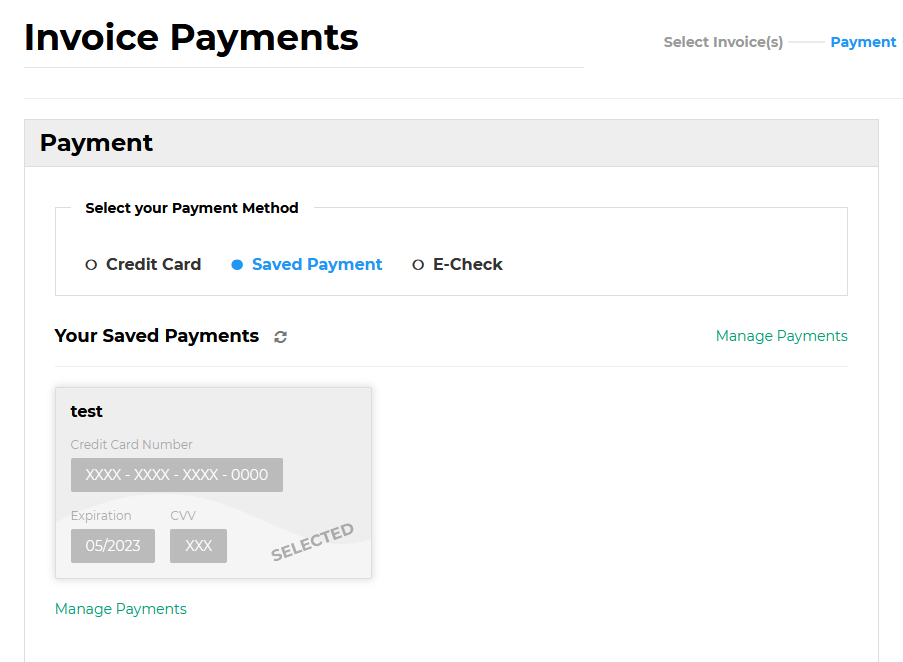
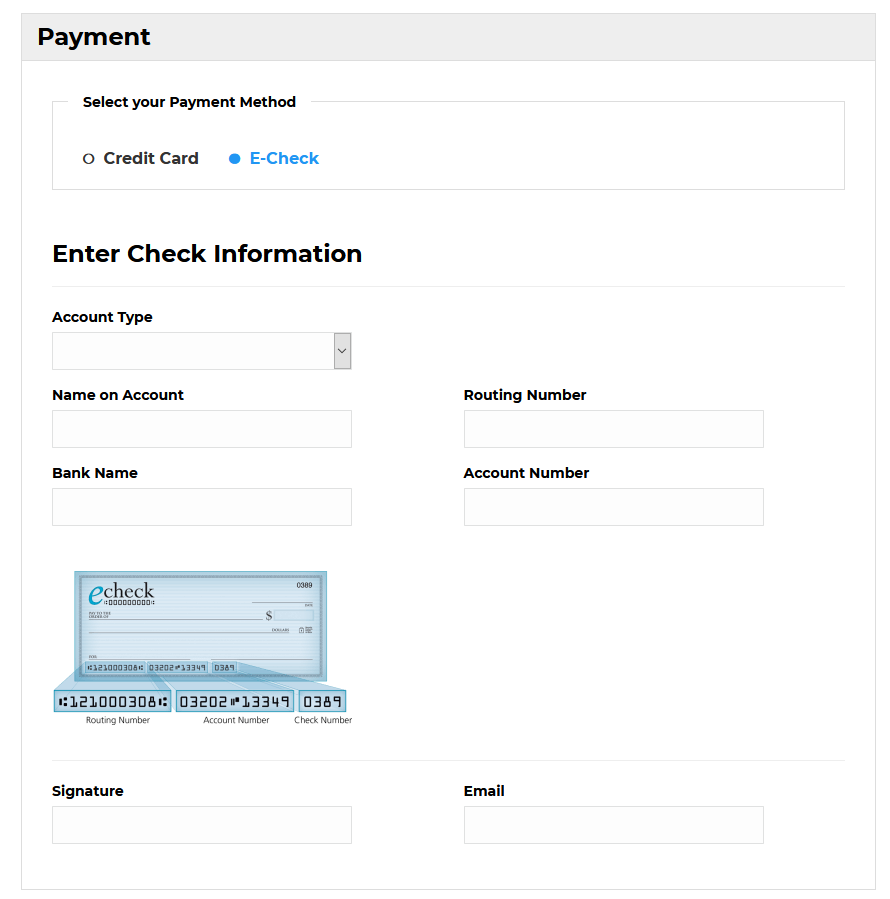
1. Select you Payment Method - Select Credit Card, Saved Payment, or E-Check and populate the require fields for each payment type.
- Credit Card
- Saved Payment - click on the appropriate saved credit card, SELECTED will display in the bottom right corner
- E-Check
.png)
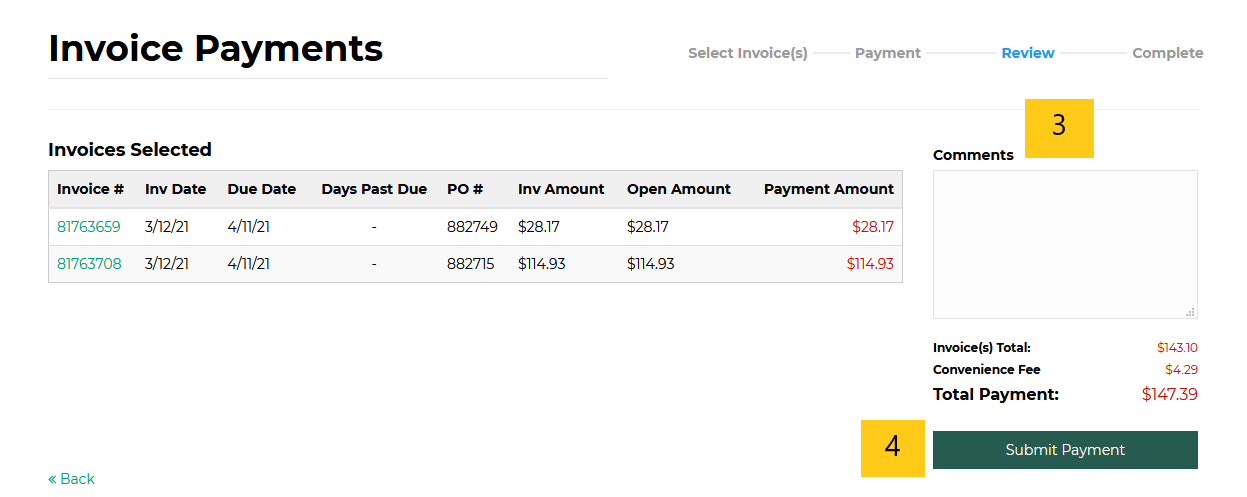
3. Comments box - enter any comments you want to attach to the payment here.
4. Submit Payment - select "Submit Payment" to complete your transaction.
Once the payment has been submitted you will receive a notification email with the details of the invoice payment.
* 3% Convenience Fee is added to all Credit Card Payments
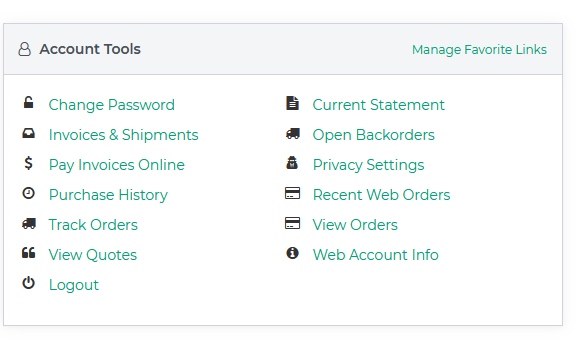
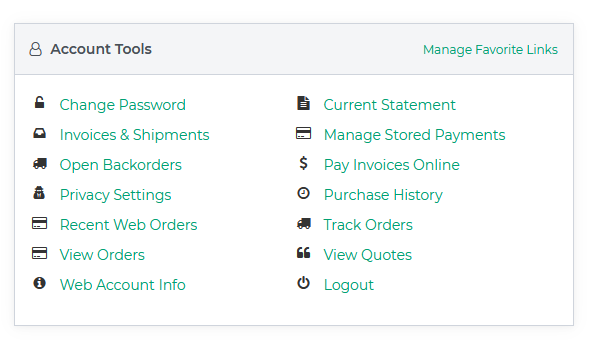
Go to the My Account menu and select Manage Stored Payments from the Account Tools Section
Step 1 - Entering New Payment Information
1. Select the + Add a new payment box.
.png)
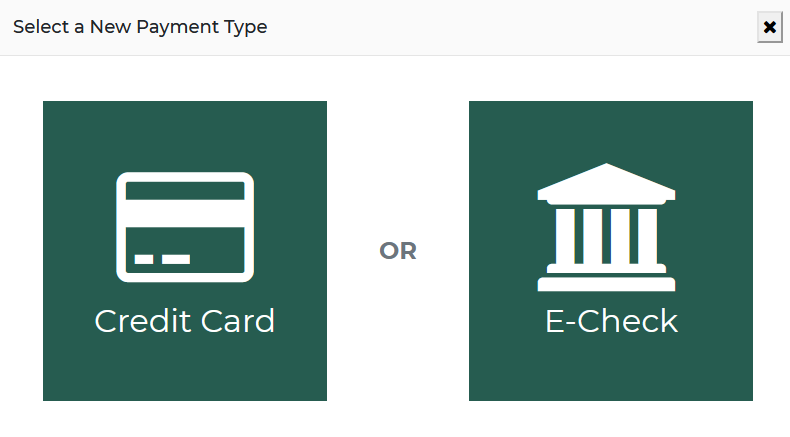
2. Select the appropriate payment type: Credit Card or E-Check.
.png)
Adding a Credit Card to the Account:
1. Card Nickname - Give the credit card an easily identifiable name.
2. Name on Card - Enter the card owner's name exactly as it appears on the credit card.
3. Card Type - Select the appropriate card type from the drop down (MasterCard, Visa, Discover, or American Express).
4. Enter Credit Card Information:
a. Card Number - Enter the number on the card.
b. Expiration Date - Select the expiration date's Month and Year from the drop downs.
c. CVV - Enter the 3 or 4 digit security code.
5. Enter Billing Address Information:
a. Address - Enter the bill to address associated with the credit card.
b. Address 2 - Enter the bill to address associated with the credit card.
c. City - Enter the bill to city.
d. State - Select the bill to state from the drop down.
e. Zip - Enter the bill to zip code.
f. Country - Select the bill to country from the drop down.
6. Phone Number - enter the phone number associated with the credit card.
7. Add Payment Option - To save the payment information select the "Add Payment Option" button after you have entered all the required information.
* Repeat process to add additional credit cards to the account
.png)
Adding E-Check information to the Account:
1. E-Check Nickname - Give the E-Check account an easily identifiable name.
2. Account Type - Select the appropriate account type from the drop down (Checking, Business Checking, or Savings).
3. Name on Account - Enter the account owner's name.
4. Routing Number - Enter the bank's routing number.
5. Bank Name - Enter the bank's name.
6. Account Number - Enter the account number associate with the account type selected.
7. Add Payment Option - To save the payment information select the "Add Payment Option" button after you have entered all the required information.
* Repeat process to add additional E-Check accounts
Step 2 - Editing Existing Payment Information
.png)
1. Pencil and Paper Icon - Select this option to modify details on an existing saved payment method.
2. Trash Can Icon - Select this option to completely delete the payment information from the account.
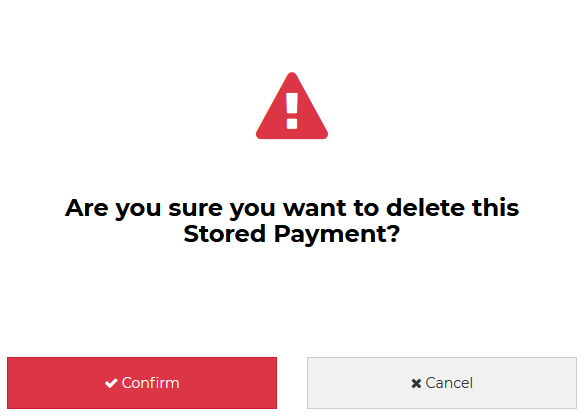
a. Click the Confirm option to complete the removal of the stored payment credit card information.